Showing posts with label tip. Show all posts

Sunday, May 09, 2010

My iPhoto Workflow

As mentioned previously, I've just switched back to iPhoto after a few months using Aperture 3. One of the reasons for doing this was that I found the workflow in iPhoto to be as good as, if not better than, the most-recommended workflow in Aperture.

I promised to explain my workflow in iPhoto, so here it is. I hope someone finds this useful.

Step 1: Import

iPhoto's import process is pretty smooth, so this step doesn't need much comment. When you plug in your memory card it jumps to the import screen right away and starts bringing up previews of the contents of the card.

I usually don't bother to type the event name at import time, as there are often multiple events on my card, but I always choose Autosplit events after importing and Hide photos already imported. My events settings are shown below, with Autosplit set to Eight-hour gaps. I find this is a good middle-ground setting to use, but this is really a personal preference and doesn't really affect the workflow much.
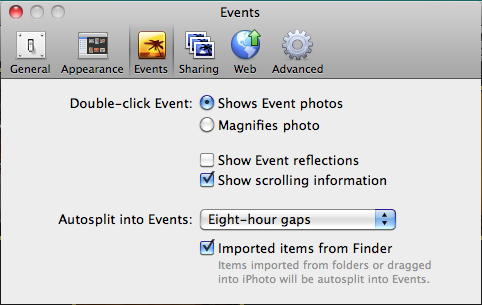
Events Settings

I always use the Import All... button to get everything off the card quickly. You don't want to mess around with picking out images while they are still on the card. Just get them onto your hard disk and have iPhoto wipe the card when prompted. (Note: if you are really paranoid, you can kick off a Time Machine backup when iPhoto shows the Delete photos from your card? prompt.)

Step 2: Event Merging & Splitting

The first thing I do once I have the images in iPhoto is clean up the boundaries between events. Usually, with the 8-hour gap setting above, iPhoto gets it mostly right, but depending on the shoot it might split them up too finely or clump multiple things together. If the photos are from a multiple-day trip somewhere, I prefer not to put them all together into a single event, but rather have each event in iPhoto represent an activity or episode of the trip. (Note: one advantage Aperture has here is the ability to group events into folders. In iPhoto you just have to rely on the chronological proximity of the events to keep them together. However, I don't find this to be a problem at all.)

The best way to do this is on the Last Import view that is shown automatically after importing. Make sure you have event titles displayed (View > Event Titles). Just use drag-and-drop to merge events, and the Split button at the bottom of the screen to split them. Give the events titles – preferably the title you would use to publish a Set to Flickr.

The rest of the workflow is per-event, which is useful for breaking the work of processing images into manageable chunks.

Step 3: First Pass - Picks and Garbage

This step is equivalent to the "stack sorting" and "rejection" steps of the Aperture workflow, rolled into one.

I select the first image in the event, and hit the Space bar to blow it up to fill the iPhoto window. Then, I simply use the Left/Right arrow keys to quickly flick through the images, and the Delete key to "reject" unwanted ones.

This works great for "stack sorting", because it is very easy to find a sequence of shots that are very similar (e.g. where I have been trigger happy with the high-speed shutter on my 50D). I love being able to quickly flick back and forth between shots in-place to decide which is better. I find that comparing images side-by-side makes this harder, but by flicking between shots in full-screen lets me keep my eyes on the focus point, or notice subtle differences.

The reason I delete the non-picks is because I never want to see them again. If I make a mistake, I can easily fish them out of Trash. Better yet, when I finish processing a session I can empty the Trash and recover tons of disk space.

Apart from non-picks, I also use this step to get rid of "rejects", i.e. photographic failures like closed eyes, unrecoverably wrong exposures, out-of-focus shots, and accidental shots.

The key with this step is ruthless efficiency. I want to cut down the number of images as early as possible, so I try to rip through them quickly and just delete as much as I can stomach.

iPhoto just wraps around when it gets to the end of the event, so keep an eye out for that to avoid going through them all again. You can always hit the Space bar to quickly go back to thumbnail view to check where you are.

Step 4: Second Pass - Name Faces

The Faces feature in iPhoto '09 is pretty good but not 100% automatic, so you need to actually confirm the faces it finds. Trying to do this retrospectively over an entire photo library is extremely painful, and the lack of a "show me all the unnamed faces" feature makes it even worse. So I like to get this done on a per-event basis as I add them to my library.

In thumbnail view, select all images with Cmd-A and choose Detect Missing Faces from the right-click popup menu. Watch the little spinning arrows next to the Faces folder, and when it stops, click the Name button at the bottom to go into face naming mode.

I like to use the keyboard as much as possible here. You can press Tab to move through all the faces found in each photo, and type or accept iPhoto's guesses with Enter. Unfortunately I haven't found a keyboard way to remove faces iPhoto has detected; you have to use the mouse for those. And of course you need the mouse to use Add Missing Face.

Step 5: Third Pass - Editing and Losers

At this point, I have weeded out all the photos that will never make the final cut, and iPhoto now knows where all the faces are (which is important, as we'll see). Now we are down to serious photography, so it's time to go full-screen (Cmd-Opt-F) and make use of that nice big shiny Mac monitor. (It might be a good idea to lower the ambient light in the room to minimise reflections on that nice big shiny Mac monitor, too...) At full-screen, this is the biggest the photos are ever likely to be displayed, so if they look good here, they'll probably look good everywhere.

The objective of this step is to make photographic adjustments, and decide the final cut. iPhoto's full-screen mode is its edit mode. I look at each image, make adjustments if needed using the editing tools, and decide if it's a winner or a loser. If it's a loser, I use Cmd-L to flag it as "hidden", which removes it from view and goes to the next image. (Note: if iPhoto doesn't move to the next image when you hit Cmd-L, you probably have it set to display hidden photos. Use Cmd-Shift-H to turn this off.)

A few tips for making adjustments:

  • If you shoot in RAW (you should if you can), you can recover a tiny bit of detail from washed-out areas by holding Option when using the Adjustments window. The Exposure slider changes to a Recovery slider.
  • The magic wand Enhance button is pretty damn good considering the difficulty of its job. I often use it as my only edit, or at least as an excellent starting point. It is particularly good at finding the correct white balance.
  • Having all the faces identified is a big help for editing, since photos containing faces automatically have the Avoid saturating the skin tones option checked.
  • Cropping is often a great edit. iPhoto's cropping tool includes the 3x3 grid so you can find those "rule-of-thirds" sweet spots. But don't crop too much, because obviously this will reduce the resolution of your image.

I try not to make too many edits, because it reduces overall image quality (no matter what tool you use), and as a general philosophy I think it's better to try to get good shots to begin with. If I find a photo is still not satisfactory after 3 or 4 edits, I usually give up on it and mark it as a loser.

Update: As pointed out in Larry's comment below, it is important to note that editing doesn't affect the quality of the original image at all. You can always revert to the original if you mess up. The point I was trying to make here is that trying to squeeze too much out of a photo with edits can impact the output image quality.

Step 6: Pick of the Shoot

By this time, I usually have a favourite shot in the event, or at least a couple of candidates. I go back to thumbnail view, maybe preview them with Space if I need, and choose my overall best shot. I make it the "key photo" of the event by right-clicking and choosing Make Key Photo.

The nice thing about this is it means my Events view is automatically a single view of just my best shots.

Step 7: Places

I don't usually bother to get my places down to exact coordinates, so at this point I finish off the event by going back to the Events view and clicking the little "i" icon in the corner of the event tile to set a location for the entire event. This will apply to all the photos inside.

Step 8: Publish & Share

As I've noted before, it's important to get your photos polished and put them out there as soon as possible after the shoot. Personal photos are like fruit; they are much better fresh.

Since iPhoto has built-in ability to share on MobileMe, Facebook and Flickr, and it can even keep the online albums up-to-date automatically, I tend to just publish to all three. In a way, it's like having three online backups of all my photos in addition to my Time Machine – that's pretty safe!

I also like to create & purchase photo books from Apple if I want to keep the photos out on my coffee table for visitors, or send a copy as a gift to people who were on the trip with me. This is especially suited to non-technical family members.

You could even make a slideshow and export it as a movie for iPhone, MobileMe, YouTube, or a DVD. Whatever it takes to get the photos out into the world where they will actually be seen. After all, that's the point isn't it?

OK that's it! Repeat steps 3 to 8 for each event.

Ratings

Although iPhoto has the same 5-star rating system as Aperture, I find I don't really need them. The rating system most Aperture users recommend maps to my iPhoto workflow as follows.

  • × (rejected; something photographically wrong) = Trash
  • Non-pick of stack = Trash
  • ★ (technically OK) = Hidden
  • ★★ (might be OK with processing) = Hidden
  • ★★★ (Flickr-worthy) = Not hidden
  • ★★★★ (pick of the shoot) = Key Photo of event
  • ★★★★★ (one of all-time best) = "Best Shots" album

I have an album set up called "Best Shots", where I put my all-time best pictures. I don't use Albums for anything but this, as I find Events have pretty much replaced them functionally.

So there you have it – that's my iPhoto workflow. I hope you find this helpful. Let me know what you think in the comments.

Sunday, July 26, 2009

Birthdays Calendar on iPhone

I finally figured out how to get the "Birthdays" calendar to show up on the iPhone! It's a bit of hack, but at least it's automated. Note: you need to be a MobileMe subscriber for this. I'm sure there's a way without MobileMe, but this is what I used.
  1. Right-click on the "Birthdays" calendar in iCal on your desktop Mac, and select Publish...
  2. Select Publish on: MobileMe and check all the checkboxes. Then click the Publish button.
  3. On the iPhone, go into the Settings app and tap Mail, Contacts, Calendars.
  4. In the Accounts section, tap Add Account... and select Other.
  5. In the Server field, type: homepage.mac.com/username/.calendars/Birthdays.ics
  6. In the Description field, type: Birthdays
  7. Leave Username and Password blank.
  8. Set both Use SSL and Remove Alarms to OFF.
  9. Save and exit the Settings app.
Unfortunately there doesn't seem to be a way to change the colour of the calendar, and on mine that means it doesn't match the green colour of the Birthdays calendar on my desktop.

Wednesday, June 24, 2009

Once-a-Day Email

This is the fourth post in a series on Extreme GTD.

I get around 600 emails a day at work. With a lot of hard work on automatic filters, I can get that down to about 300. I don't subscribe to any Internet mailing lists, so all 300 are real work emails.

The way I have learned to deal with this, without spending my whole day reading and replying to emails, is to process them only once per day. I find that this is easiest to do in the morning. I wake up very early, get to the office before anyone else, and power through the whole lot in one sitting. I also process my in tray and notebook. It takes about 2-3 hours to do it properly.

Then I close my email for the rest of the day.

You would think that this would be a problem, but it's surprising how little difference it makes to my interactions with other people. But it makes a huge difference to me. After my email sprint in the morning,

  • all my inboxes are empty,
  • I am completely up-to-date on everything that's happening,
  • all my next actions lists are updated, and
  • I have scheduled my actions for the day.

It's awesome.

Part of my secret for getting through email quickly is a view I have set up in Outlook* which is very similar to the "conversation view" in Gmail. (Any email application that allows grouping of emails by conversation/thread will work well, especially if it has the ability to show a small preview of the first couple of lines of text.) Since I don't read email during the day, all the conversations that I am CCed on carry on happily collecting into conversation threads.

As I go through my emails in the morning, it's very quick to see which conversation threads will probably not require my attention, and just delete the whole thread in one keystroke. Gone. There are also usually a large number of threads that could be important, but I just expand the thread and scan the preview lines. This is great for picking up when someone suddenly directs the conversation to me - the first line is "Will, Do you..." So this trick helps me whittle down 300 emails to about 100 fairly quickly. But the real beauty of this is that it's amazing how many conversations end by themselves without me needing to get involved.

I think people don't seem to notice that I'm only reading email once a day, because if I reply, it's usually before they arrive in the office in the morning, so no email goes unanswered for more than 24 hours. About 2-3 times per week, someone will ask me, "Did you see my email?" Although I have my Inbox view closed, I still have Outlook open, so I can quickly look if I have to.

My advice: Don't knock it 'til you try it. You might be surprised at how well this works.

* I will post about my Outlook GTD set-up in a later post.

Tuesday, June 23, 2009

Real Contexts

This is the third post in a series on Extreme GTD.

As I've mentioned before, the absolute key to GTD is Processing, which is thought-driven. Everything else, including Contexts, are just tricks. Contexts is a trick specifically designed to avoid thinking, or at least to minimise it.

So it is perfectly possible and acceptable to not use Contexts in your GTD system. In fact, I recommend avoiding Contexts in the beginning. You need to feel their absence in order to understand what they're good for, and how much you can get done without them.

The key to using Contexts effectively again comes back to effective thinking during the Processing step.

The trick I use is to ask myself, "What is stopping me from doing this next action right now?" there are three types of answers to this question:

  1. It's not really the next action. If so, I haven't finished the Processing step. Think of the next action and repeat.
  2. It will take more than 2 minutes, but otherwise I could do it right now. Great. Put it on the actions list with no Context.
  3. I need to be somewhere or with someone to do it, but otherwise I could do it right now. Great. That's the Context. But wait - there's a catch...

When I find an action in the third category, there is still some thinking to do. How will I remember this action when I'm with that person, or in that place? There's no point in adding the action to my Outlook tasks folder if I won't have it with me when I'm next there. There's no point in putting envelopes I have to post in my "Out" tray if I'm not in the habit of checking it before I leave the house. The key is to really think about what is the best way to remind myself of this action when I'm next in that Context.

One example of this that has worked really well for me lately is to use my notebook, which I carry around with me whenever I'm not at my desk. Lately, nearly all my time is in meetings away from my desk, so entering actions in my Outlook was pretty much useless, except for actions that could be done at my desk.

I use my notebook for capturing notes during meetings, and I always start a new page for each meeting, with the title of the meeting at the top, and the date. The difference now is that I start the meeting page before the meeting has happened - as soon as I have a next action that can be done at that meeting. Then, on the day of the meeting, instead of starting a new page, I go to the page I've already created, and there is the list of things I need to bring up.

The same trick works for people instead of meetings. If I need to speak to somebody to get it done, and an email won't do (really think about that choice), I start a new page for that person and write it down there. Then whenever I'm either one-on-one with that person, or happen to be in a meeting with them, I can flick to their page in my notebook and make sure I cover the actions.

The handy thing about the notebook trick is that I can write the results of those actions right there, and I will see those notes when I next do my Processing.

Another important point to note about actions that require a Context is that it's easy to use them as an excuse to not finish thinking during the Processing step. You know you've made this mistake when you see the action on an actions list but when you're there, you find you haven't got a good way to approach the subject. A warning sign is when the person you're talking to doesn't understand what you're asking them. To get around this problem, my trick is to mentally visualise the meeting, and try to think of the first few sentences I will say. That's usually enough to help shake out the real next action.

Sunday, June 21, 2009

How to Stop MobileMe from Deleting Trash After 30 Days

MobileMe email has the annoying "feature" that unlike Gmail, if you "delete" an email, it only stays in the "Trash" folder for 30 days.

Here is a simple workaround for this problem:
  1. Log into the MobileMe Mail site, and add a folder called "Archive" (or something else if you prefer). Move all your existing deleted emails in your Trash folder into Archive.
  2. If you use MobileMe with Mail.app, right-click your MobileMe Inbox and select Synchronize MobileMe. Your new Archive folder should appear somewhere on the mailboxes pane. Select the Archive folder, and then go up to the Mailboxes menu and select Use this mailbox for > Trash. On my system, it changed the name of the folder to "Deleted Messages" when I did this.
  3. If you use MobileMe on your iPhone, go into the Settings app and then Mail, Contacts, Calendars > MobileMe > Account Info > Advanced > Deleted Mailbox, then select your Archive folder.
This might actually make the new search on server feature useful!

Disclaimer: I just followed the above steps today. In theory it should work, but the above is untested. I will post a follow-up if I have any problems...

Wednesday, June 10, 2009

The Neat Freak's Guide to Gaining Mastery Over Cables

If you're like me, you've probably got a large collection of cables and cords for connecting gadgets to other gadgets, that have slowly accumulated over the years. You've probably also got them all mixed and tangled up in a couple of boxes somewhere in your house.

I've made several attempts in the past to "organise" my cables into some kind of order, but that can be like trying to herd cats. They are awkwardly shaped, some are soft and pliable while others are stiff and hard to bend, they are all different lengths, they have differently sized plugs at their ends, etc.

Wire ties don't help much, since they only keep one part of the coil under control, while the rest can still get messy. And they do little to stop cables from getting tangled up with each other.

The solution: Cling Wrap. Yes, the stuff you use in the kitchen to wrap food before you put it in the fridge.

Step 1: Fold your cable to the length you want to store, and lay it down on some cling wrap (without tearing off the cling wrap from its roll).

Step 2: Start rolling the cable forward, wrapping it in the cling wrap. Don't worry about squeezing the cable into submission before you start rolling. Once you have got one or two rolls done, the cable is trapped.

Step 3: Squeeze the cable inside the wrap as you roll forward. Try to make it as compact as possible, and the wrap will hold it in that shape. If you've ever seen a spider catching an insect in its web, you will know what I mean. Each roll makes it more impossible for the cable to escape the tight, neat shape you've squeezed it into.

Step 4: Tear off the cling wrap once your cable is tightly wrapped and can't escape its clutches. Tidy up the loose ends, and voilĂ ! It's like shrink-wrapping your cables in a nice, neat tubular shape. If you want to make it easier to identify the cable inside, you can write on the cling wrap with a felt marker.

The beauty of this trick is that the cable is visible, so you know what it is, and the cling wrap can be easily ripped off when you need it. The cling wrap itself is almost worthless, so there's no qualms about wrapping and re-wrapping it again and again if you need to. It's also a lot easier to replenish your supply of cling wrap than those wire tie things.

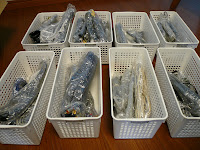
Step 5: Get some shoe boxes or similarly sized plastic baskets. (Make sure they'll fit on your shelves or wherever you want to store them.) Categorise your cables to your heart's content by putting them in separate, labelled boxes/baskets. This will give you really fast access to cables when you need them, and keep them neat and tidy when you don't.

Extra tip: You can also use this trick to keep cables tidy when they're actually plugged into your gadgets (ie. basically to shorten them).

I hope you enjoy this tip. Post a comment if you do, or if you have another good trick for beating cables into submission.